zero waste

all posts related to the zero waste lifestyle and wardrobe

The Most Sustainable Option is the One You Already Own

vintage closet full of hats, purses, dresses and shoes

I’ve been a part of the sustainable fashion movement for over a decade now, but unfortunately sustainability has become a bit of trend. You would think that sustainability becoming a fashion trend would be a great thing: we need more people becoming aware of the high cost of the fashion industry.

However, what has actually become popular is selling sustainability. But true sustainability, in my opinion, is “using it up, wearing it out, making it do, or doing without” as the maxim from the past goes.

But what we see more of nowadays are things like fast fashion brands selling garments made out of “recycled” polyester or advertising PVC as “vegan” leather. It’s still just cheap garments made out of plastic.

Or garments being made of natural materials like wool and cotton, but poor quality, so they won’t last long without pilling or falling apart.

Or consumers deciding that they should quit fast fashion and create a high quality capsule wardrobe, but they start by replacing the items they already own for new versions of the same things, or they decide to simplify by decluttering their closets without taking the time to determine if those items are ones they truly no longer want to wear… or whether they’re chasing after some eco-minimalist fantasy (and then going back out a buying new things a few months down the road).

Or higher priced ethical brands falling victim to the extremely fast turnover of micro trends and scarcity instead of crafting collections and garments which will be available for more than one season.

And consumers are definitely falling into these pitfalls that are branded as “sustainable” options, but which are far from truly sustainable. I certainly have. And I’m not saying you should never buy anything from a fast fashion brand, purchase something that is trendy, or declutter your closet.

The bigger problem is this idea that we can buy and acquire our way to sustainability and that we’re only one “green” purchase away from a completely ethical closet when, really, sustainability begins with what we don’t buy. Use it up, wear it out, make it do or do without. 

Sometimes this means just not immediately buying everything we like. “Doing without” or taking time to acquire new items (even secondhand items).

It means recognizing that the faux leather purse you already own and use every day is more sustainable than the new leather purse you could buy to replace it; “making do” until the time when an item is truly worn out. Which then leads us to the “mending” part of “make do and mend”- repurposing and repairing the things we already own to extend their usefulness and value.

Which is exactly why earlier this week I spent a few hours unpicking the seams on a pair of jeans and altering the waistband to fit. It might have been easier to just look for a different pair that fit better, even shopping at the thrift store for a pair, but I already owned these, and they work fine for what I need them for (working outside and going for walks in the cold).

mending black wool gloves

Last fall I took some time to mend the holes that had formed in my gloves. I talk a bit more about that project here. Would it have been easier to buy new gloves? Probably, but these were worth mending and definitely the more sustainable option.

But how about things that aren’t “worth mending’? The other day I ripped a hole in the hem of my dress. The dress is almost completely worn out, but rather than tossing it, I did a quick fix with some stabilizing iron-on interfacing. The fix won’t last forever, but it will give me a bit more wear out of the dress.

a gold belt with a leather patch on it

Or this faux gold leather belt which cracked on the back. It’s not the best quality item, but gluing a thin piece of leather to reinforce the material makes it strong enough to still hold.

I admit that I don’t always want to take the time to fix a broken zipper, or tailor a blouse by adding darts or unpick a wonky hem and re-sew it to be even. Sometimes it would just be easier to start fresh, but taking the time to “make do” with what you already own is the beginning of true sustainability. Fast fashion is more of a mindset. Of course some items are truly made not to last more than a few wearings and washings, but even lower quality items can last a long time if they are properly taken care of.

Here are some of the ways I thought of to “Make Do and Mend” with what we already own, repurposing worn out items and how to approach buying new items with a slow fashion mindset.

  • Taking time to do a stain treatment on a shirt
  • Washing your lights, brights and darks separately and then air drying them so they’ll last longer. Washing separately keeps your colours from fading or becoming dingy and dryers are time machines that take years off the life of your clothing.  I’ve had Joe Fresh t-shirts that have lasted up to 5+ years because I hang them to dry.
  • Following the washing instructions on the tag or hand washing and dry cleaning delicate items so they won’t shrink or otherwise get ruined. But if they have gotten ruined, they might be a candidate for upcycling into a new project such as mittens, a hat, children’s clothes etc.

vintage nylon scarf with a tear in it mended invisibly

  • Immediately darning or patching holes in garments so they don’t continue to ravel. Either invisible or visible mending, if that’s your style.
  • Polishing the scuffs in your leather shoes and replacing worn out laces or heel caps. If you aren’t able to make the repairs yourself see if you can take them to a cobbler.

polishing and shining shoes

  • Not being afraid to try repairing something- if something is truly unable to be worn in it’s current state, it doesn’t hurt to try and mend it. You might be able to save it, and you might not, but it was worth trying and you’ll most likely learn some new skills in the process.
  • Adding darts, shortening or lengthening hems, sizing up or down, adjusting waistbands etc. on pieces that don’t fit quite right, or taking them to a seamstress if you aren’t able to do the alterations yourself.
  • Turning the dress that you loved that doesn’t fit anymore into a new skirt or top that you’ll love
  • Taking up a new hobby like patchwork to repurpose textiles. Or turning them into children’s clothes- baby clothes are incredibly tiny and can be made out of quite small pieces of fabric.

felted elf style baby bonnet and matching boots with toadstools embroidered on the side

  • Not decluttering every item you haven’t worn for “x” number of months, but tucking away the items you love for the future when you’ll likely be excited to wear them again.
  • Instead of “adding to cart” every time you see an item you love, “do without” for a while and make sure it is truly a want or need, not a passing whim. If you want to move your style in a new direction, take time to slowly phase out and in new pieces rather than completely revamping with a shopping haul in your new “aesthetic”.
  • Learn which silhouettes and styles look good on you and make you feel confident. Rather than chasing every new trend, (skinny jeans, flared leg, barrel jeans, high rise, low rise…and the list goes on) wear the ones you love. Use your thrift store to try out new silhouettes and styles you aren’t sure of before taking a risk on more expensive pieces
  • Before you buy a new item, figure out how it will fit into your existing wardrobe. Will it fill in the gaps and does it coordinate with at least three existing outfits, or will it lead to you needing to make more purchases because it doesn’t go with anything else you own?
  • Consider the cost per wear of items you’re looking to buy. Statement items and accessories may be places to either splurge or save, depending on how many times you’ll wear them. For example my everyday satchel purse cost more than I’d ever spent on a bag, but is currently at less than $0.50 / wear, while my statement bamboo bag cost significantly less, but is sitting at $10/ wear.

everyday leather satchel and bamboo handbag

  • Declutter items responsibly- try to sell them or find new homes for them within your community, family and friends, or on a buy nothing group first instead of defaulting to sending to the thrift store. Don’t send anything to donation that you wouldn’t give to a loved one (ripped, stained or otherwise worn out) unless they accept textiles as rags, and then make sure you clearly label them as such.
  • Pay attention to which garments you’ve bought from brands that have lasted and which have not. I’ve bought clothes from the same brand (Mark’s) before where one t-shirt style held up well, while another did not. If you’ve bought an item that didn’t stand the test of time, learn from it so that your next garment purchase will be a better quality one.
  • Save the buttons, buckles and other hardware off of clothes that are worn out and use them for future projects
  • And if an item is worn out (we live in a world where moth and rust destroy after all) then repurpose the fabric for rags or dispose of it. Or use the fabric scraps to stuff a pouf!

And the best part of these tips? Not only are they more sustainable by keeping textiles out of the landfill, but by keeping money in your wallet!

Because the most sustainable option is often the one you already own.

What environmentally friendly or thrifty habits do you practice? Share your tips!

serger and sewing machine on top of sewing desk

Covering Up a Logo on a Tote Bag to Make it Cute

before and after of covering up a logo on a tote bag

I got this tote bag from our church swap group, well actually it was tossed in as an extra with some other things I had gotten, and I am not one to turn down a good reusable canvas tote bag! However, this bag had a logo stamped across both sides and I don’t want to be free advertising for a company. (The only logo I don’t mind carrying around is my public library tote!)

tote bag before with the logo on the front

It is a really nice canvas bag though, so, what to do? I figured I could come up with a way to cover the logo, while still making it look intentional. Because this tote had the blue striped pieces on the sides already, I figured that if I added some more fabric pieces, it would look like a patchwork.

So, it was time to looked through the fabric scraps basket, and I found a piece of canvas and a piece of gingham I have had for about….20 years? This is why you should always keep your fabric scraps- you just never know when they will come in handy! Originally I was planning to do a fabric appliqué across both sides, but because this gingham was a previously cut piece, it wasn’t wide enough for two strips. So, then I realized I could do a pocket! (Actually the pocket might have been my mom’s idea) And instead of doing the pocket in just gingham, I used some canvas and put a strip of gingham across the bottom of the pocket for interest. I  discovered that the logo showed through the plain canvas, so that is why I opted to place the patterned fabric across the bottom.

cutting out and sewing a pocket for the front of the bag

For the pocket, I sewed the canvas and gingham together and then folded all of the sides in about 1/4″. The top was folded down twice and top stitched so all of the edges were encased.

pocket on the front of the tote bag lined up exactly to cover the logo

If you decide to do this, make sure to measure twice and cut once. I didn’t measure at all and cut immediately, so when I went to place the pocket, I discovered that the logo was not in the centre of the bag, nor was it aligned from top to bottom, and not only that, but I had made the pocket the exact width of the logo, so there was no room to play with! I even had to sew the corners down by hand to make sure they won’t curl up and show the blue underneath! So, make your pocket an inch wider than your logo, so you don’t have to worry about that.

pocket placed on the tote bag over the logo

Once you have pinned your pocket in place exactly in place to cover the logo, then top stitch the pocket along the sides and bottom. And then that side of the bag is done.

For the other side of the bag, I decided to do a simple appliqué. First, open up the side seams just enough to slide your fabric into place.

Side seam of the bag opened to insert the new fabric piece

Cut a strip of fabric long enough to go from seam to seam and tall enough to cover the logo. Press 1/4″ seam allowances along the top and bottom. Pin in place securely, so there are no wrinkles or bubbles.

applique fabric pinned in place

Stitch along the top edge, then turn the bag 180 degrees and stitch along the bottom of the strip, very close to the edge.

sewing the piece of fabric in place

Sew the side seams back up, and serge them again to finish them off, and then you are done!

serging the seams to finish them off nicely inside

Here is how the pocket side turned out…

pocket sewn over the logo on the tote bag

And here’s the appliqué side.

gingham applique sewn over top of the logo on the tote

And there you have it: a nice new reusable tote bag, and no one would ever guess that there was a logo hiding underneath!

Upcycled Christmas Card Gift Tags

diy wrapped gifts with upcycled christmas cards turned into gift tags

I love Christmas cards! Whether I make them myself, or buy them (usually the year before on-sale after Christmas) I love picking out a sweet design and mailing them to friends and family far away. Traditional Christmas cards seem to be a dying tradition, with many people opting for photo cards or e-cards these days, but I do still receive a few old fashioned cards in the mail.

There are some really pretty card designs, and I always hate to recycle them after the holidays, so last year I saved all of the cards I and my family received, and upcycled them into gift tags to use this year! I love wrapping gifts, and it was nice to be able to reuse the cards, coordinating the wrapping papers and ribbons to go with each tag. This was such a quick and easy DIY, it’s can’t even be called a tutorial, yet I did want to share the idea with you, in case you also hate to toss greeting cards!

supplies needed for the craft all laid out on the cutting mat: templates, blades, hole punch and greeting card

I used my Creative Memories oval templates and blades to cut the tags. This is the cutting system I got a long time ago…maybe 18 years? After all these years, it’s still going strong and I love it!

lining up the template and oval cutting guide

Centre the template onto the artwork and cut it out.

lining up cutting system template and blade onto old greeting card

Punch a hole in the top of the card, and then string a piece of twine or ribbon through. I used the Fiskars small holepunch. A few of the cards had writing on the back, so I cut out an oval the same size out of green paper and then glued the two ovals together to cover it up.

Punch a hole in the top of the card and thread a string through

That’s it! As I said, not really a tutorial, but more of an inspiration for gift wrapping. I know Fiskars makes some large tag punches, so that could work if you don’t have oval/circle cutters. Or, if you don’t have any punches, you could cut the fronts of the cards off, measure a 45 degree angle across the top corners and cut them into traditional tag shapes.

I wrapped all of my gifts this year in reused kraft paper bags and wrapping paper. I also reused old pattern paper as tissue paper.

finished upcycled christmas card turned into a gift tag

I even wrapped one gift in an old parchment paper document. And all of the ribbons were saved from previous years as well…these are very zero waste packages!

Do you like wrapping gifts? How did you wrap yours this year?

zero waste christmas wrapping

kraft paper wrapped gift with twine and an upcycled card tag

How to Sew Felted Wool Slippers Out of an Old Sweater

green and grey felted wool slippers with an embroidered button on top

I’ve never been much of a slippers person. Usually in the winter I go around barefoot in the house because I’m in danger of being too warm, not too cold. However, there have been a few cold days so far this winter where the house has felt rather chilly and I’ve been trying to bundle up rather than turn up the thermostat. I don’t have any super warm socks, so I decided that the next item I would make would be some felted wool slippers out of a sweater. So far I’ve made mittens, a beret, and some baby boots and shoes, so it follows that the next item to make would be slippers.

I actually ended up making five pairs of felted wool slippers, so the technique was pretty well perfected by the time I got to this pair. I didn’t love how my first attempt turned out, so my sister took that pair. Then I made a pair for my mom. Then I attempted another pair for myself, but they ended up too small, so I donated them to the women’s shelter. Then I made a pair for my brother-in-law. Finally I made this pair and, after all that practice, they turned out pretty nice.

I estimate that they took about 1-2 hours to sew, so they are a relatively quick afternoon project. (Not including the time to felt the wool) If you’re looking for a Christmas gift for someone, then these would be the perfect handmade option!

finished felted handmade wool sweaters

To Make Your Own Felted Wool Slippers, You Will Need:

  • A 100% old wool sweater. Make sure it is real wool content, so it will felt for you. I know you can also use blends that have a high wool content, but I’ve never done that myself, so am not sure whether they felt differently or not.
  • Needle & thread/ sewing machine
  • Button to cover, or a decorative button of your choice 
  • Elastic to make the slipper fit tighter around the ankle, optional

folded shrunken april cornell green wool sweater

The first step is to felt your wool if it isn’t already. You can put it in your washing machine on hot, with a bit of detergent and then wash as normal. If you put in a few sweaters, they will felt faster, because of the agitation. Check your wool once washed, and see if it is felted enough- if not you can repeat the process until it is. Then let it dry.

I would not recommend that you take a perfectly good wool sweater and felt it, because it always seems like a waste to cut up something in good shape that someone could actually wear the way it is. However, there are so many wool sweaters in thrift shops that are no longer in good condition. Whether it’s due to the previous owner accidentally shrinking them, or they are full of moth holes and runs, the thrift shops are full of them. This project is a perfect way to recycle and refashion those sweaters that are completely ruined and useless into something new! I’m using a green boiled wool coat and the binding from a grey cardigan.

pattern with dimensions for slipper

To make your pattern, trace your foot and then round out the curve. You can make a “left” and “right” sole if you’d like, but it isn’t really necessary because the wool will mold to your foot. You can make one pattern piece with 1/2″ seam allowances and one without, or you can simply trace the pattern piece, adding the seam allowances on your fabric. My sole pattern piece measures 3.75″ wide by 9″ long.

The slipper top pattern is shaped like a “U”. Measure across your foot at the widest part and draw a semi-circle with that width. My foot is 5.5″, so my pattern piece is 6.5″ across with seam allowances. For length, I made it the same as my sole, plus 1/2″ for seam allowance (finished length 10″). You can double check the measurements of the outside edge of the piece with the outside of the sole. This isn’t super exact and the wool is a rather forgiving material to experiment with (if you make it a bit too long, you can always shorten it). Make the “U” cutout inside the semi-circle piece the width of the opening you want for your foot. Or, measure how high up your foot you want your slipper sides to be, and make your “U” in those dimensions. My upper pattern piece measures 10″ long and 6.5″ across. The cutout inside measures 5.25″ long by 1.25″ across. I’m a size 8.5 for reference. These dimensions include a 1/2″ seam allowance around the outer edge of the upper pattern piece. (For the pair I made my brother-in-law I added an inch to the length of the sole and then replicated that length onto the top piece.) Also note, I angled the back edge a little bit so it would slope into the heel.

Cut 1 upper piece for each slipper.

I’m sure you could make the slipper soles with one layer, but I did two layers of wool for extra warmth. Cut 2 insoles using your pattern with no seam allowance added. Cut 2 outer soles with the seam allowance added- see the picture below.

Felted wool doesn’t have a grain, so you can cut your pieces wherever they fit.

pieces of felted wool cut into pattern pieces

Place your insoles (the grey pieces) on top of your outer soles (the green pieces), smooth them flat and pin around the edge. Using a zig zag setting, stitch the two pieces flat around the edge to create one piece.

sewing the insole and outsole pieces together

Next, stitch the top heel ends together. I lapped mine rather than using a normal seam, so as to reduce bulk.

stitching the top of the slipper heel together

Now take your top piece, and pin it to the sole, easing the fabric around to distribute the bulk. Make sure that the right sides are pinned together: this means that your insole is facing outward. I made my mom’s with the smaller insole on the outside, but I think they look better with that raw edge flipped to the inside of the slipper.

Once you’ve pinned the life out of them, sew around the edge with a zigzag stitch, following the edge of your insole. (I realized when looking at these photos that I added a 1/2″ seam allowance to the pattern, but sewed my seam at only 3/8″. It turned out OK though.)

sewing sole to the top of the slipper

Turn the slipper inside out and try them on to see how they fit. If they fit well, then you can grade the seam a bit to reduce bulk.

slipper top and bottom sewn together

If the slippers fit well as they are, depending on the thickness of your wool, you might be able to finish the slippers off at this point with a blanket stitch along the top edge. If they are too loose to leave like that, then you can move on to the next step which is adding a cuff to the top.

I cut the binding off of the collar of a sweater to create a cuff at the top of my slippers. You can also use the hem of a sweater. (I used all of the hems we had on the other slippers, so all I had left was this one grey piece!) Cut the binding piece 1-2″ smaller than the opening of the slipper.

cut binding off of the collar of a sweater

Stitch the ends of the binding together to form a loop.

stitch binding/cuff into loops

Next, with right sides together, pin around the top edge and stitch the binding to the slipper top.

pin binding to the top edge of the slipper and stitch together

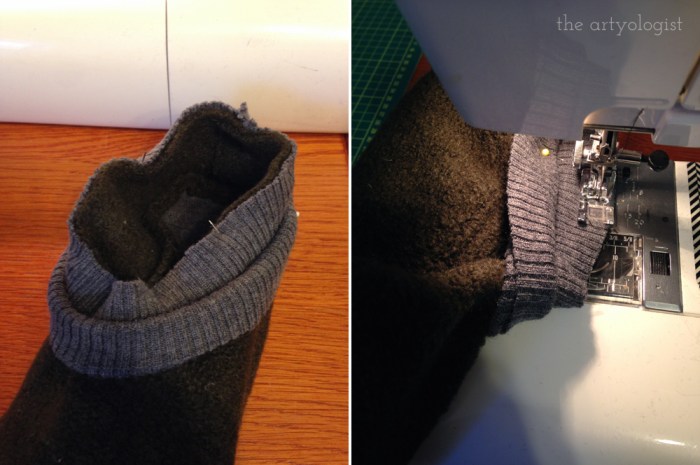
Then, fold the seams to the inside and pin it liberally! (If you think that you will want elastic around the top, you can add it now, which is a bit tricky, or you can thread it through at the end like I did.)

Now, for the trickiest part of the process, from the inside, stitch the pieces “in the ditch” or slightly onto the top slipper piece. This is hard to describe, but if you look at the photo, it should make sense. If your binding has a finished edge, you don’t have to fold your seam under, which makes this step a bit easier. However, my binding was a cut edge and I didn’t have enough length to felt it, so I decided to fold the edge under for neatness. I probably could have left it raw, but this worked out OK.

topstitching the cuff to the slipper with raw edges encased

It isn’t perfect in all places, and the stitches show through on part of the cuff on the front of the slipper, (it must have shifted during sewing) but it is sturdy. And as my brother says, quoting one of the creators he follows, “It’s not just good, it’s good enough.” I’ve been trying to embrace that philosophy a bit more in my projects. I tend to be a perfectionist, but sometimes that means that projects don’t get done. I’d much rather that there are a few stitches showing, but I have usable slippers, than a pile of unused felted wool in a basket on my shelf.

slippers sewn together with some stitches showing on the front of the cuff

Once I put the slippers on, I realized that the cuff was a bit too loose for my foot. While I could have tried wetting the slippers and shrinking them a little bit, I was afraid that they’d end up too small again, so I decided to instead add a small piece of elastic to the top of each slipper. I cut two pieces of this small round elastic, and then threaded them through the top of the slipper. I simply sewed the ends of the elastic together and then hid the end inside the seam.

threading elastic into top cuff to make them fit better

Then for the final step, because this sweater had all these cute embroidered buttons, I decided to add one to the top of each slipper, just for fun!

embroidered wool buttons and elastic added to the finished felted wool slippers

And there are my cozy warm felted wool slippers perfect for the cold days this winter! Of course we only had a few really cold days since I’ve made them, but I’ll be ready for the next cold snap! They’ll be perfect for Christmas morning too.

I’m really enjoying making projects out of felted wool; it’s such a great way to use up old sweaters. We’ve had a bin of sweaters for years, and making all of these actually used up quite a bit of them- what will I do when they’re gone!?

Are you a slippers person? Do you think you’ll try making your own felted wool slippers? What project should I make next out of the wool? What other projects have you made with felted sweaters?

finished felted wool slippers details

green and grey handmade felted wool slippers

Sewing a Zero Waste Pouf (And Using Up Fabric Scraps!)

zero waste pouf made out of a recycled white quilt with vintage books sitting on top of it

The sewing project I’m sharing with you today has taken me years to complete…literally, and there were two things that sparked the idea for this project. One, I read a news report several years ago, right when the Canada Goose winter coats were super popular, about a company making counterfeit coats filled with factory floor textile sweepings instead of goose down. Aside from the fact that they were scamming people, I thought that using up fabric scraps as insulation was actually a pretty ingenious idea. Then, right about that same time, I saw a blog post by Brittany of Untitled Thoughts (I can’t find the specific post) about a pieced scrap pouf which had been filled with cotton quilting fabric to use as a means of storage in your sewing room. So, I melded the two ideas and now several years, and a LOT of scraps, later I have finally finished my (almost completely) zero waste pouf!

What exactly is a pouf and what makes it different than an ottoman or a footstool? Well, an ottoman or a footstool has legs or is made of a frame with a padded top, whereas a pouf is just like a giant pillow, without any kind of base structure. So are you interested in making your own? Here’s how I did it!

a giant pile more than a metre long of textile scraps

First, you will need to start saving scraps, and this is the longest part of the project. I saved everything including synthetic fibre clothing such as t-shirts, hoodies, jeans and pantyhose which couldn’t be used for rags. I also saved the seams out of the garments that we did cut up for rags. And, of course, I saved sewing scraps of all sizes, like I mentioned in my post last week. I saved these textile scraps in a giant black garbage bag and though I initially thought I had way too many scraps, I actually ended up using all of them plus more. In the image above, that is a metre stick for reference.

Once you’ve gathered about 1.5 times the amount of scraps you think you’ll need, it is time to start readying your pouf lining!

drawing of the dimensions of the fabric for the lining

Figure out the dimensions of your pouf. I made mine 20″ across, so the circumference was approximately 63″ around. I mapped out my pattern pieces on a grid paper determining what size of pieces with seam allowances would fit exactly into the fabric I was going to use. Also note, depending on which kind of fabric you’re going to use, you might want to make the bottom out of a more durable (and affordable!) fabric like canvas since it won’t be seen anyway. Originally I was going to make my pouf out of mustard velvet, and pleat the top into the centre like a vintage round pillow, but once the fabric arrived (from Etsy)…it was not the right colour of yellow, so I ended up changing my plan.

Cut out 2 circles, with seam allowances, to use as the top and bottom and then either one piece or 2 pieces for the sides.

lining fabric cut and ready to sew

I used cotton canvas as the fabric for my lining bag, and I did a double layer with an old worn out mattress cover to prevent any lumps from the stuffing from showing through. You could use fleece, a wool blanket or towel as an interlining. If you are using a thick upholstery fabric, I don’t know if this step will be as important, but if you are using a thinner outer fabric, then I would definitely add that second layer. Sew the two layers together and then work them as one piece.

Sew the side piece together at the ends. Then measure the bottom circle and side piece into 4 even quadrants and pin together at those points and sew together. Do not sew the top circle on, because it will be added later.

unstuffed canvas lining bag sewn with top not attached yet

Now it is time to stuff the lining bag! You don’t want to just wad the fabric in, otherwise it will get very lumpy and misshapen. Here is the method I used to avoid as much lumpiness as possible.

textile scraps cut into tiny pieces

First, sort your scraps into piles of soft materials like fleece etc. that you will use to smooth out lumps, bulky and heavy or large pieces of fabric, and any tiny scraps. This step of sorting through and cutting the scraps will definitely make you feel like you are one of the children in the pawn shop in the 1951 movie “A Christmas Carol”. Take your small scraps and cut into 1″ or smaller pieces. I did this over several days to avoid my hand cramping.

textile scraps cut into tiny pieces and layered several inches in the bottom of the lining

Once you have a large batch of shredded pieces, place a layer several inches thick across the bottom of the bag.

folding and stacking larger textile pieces in the centre of the lining

Then, take your larger scraps and fold them. Lay them flat in the centre of the pouf and keep stacking until you have a layer several inches thick. Take more of the small shredded scraps and sprinkle them in between the centre folded “pillar” and the lining bag to create a bit of soft insulation. (Folding the pieces into the centre means that they won’t compress too much over time, so you won’t end up with a lopsided or deflated pouf.) Keep folding pieces into the bag and adding the small scraps around the outside. Once you’ve reached the top of the lining bag, it is time to attach the top.

hand sewing the top of the lining to the sides

Again, make sure to pin on four equal quadrants like you did for the bottom and pin the top circle to the side piece. Hand stitch the pieces together. You can use any colour of thread for this since it won’t be seen; I used up a bunch of old spools of red thread that had only tiny amounts left on them not enough for a larger projects.

Once you’ve stitched the “lid” halfway around the circumference, knot your thread because it’s time to start stuffing again!

stuffing the top section of the pouf with more soft stuffing

This is the time to use any fleece, batting or other soft materials, so you’ll get a nice smooth top to your pouf. Fill in any gaps with more shredded pieces. Keep pushing scraps into the bag; it will take more than you think you need. Once you’ve got the one half pretty well full, then sew another quarter of the top closed and with that final small section, push as many scraps as you can into the bag. Then finally stitch the last section closed.

lining all stuffed with textile scraps

You are not quite ready to cover your pouf, though. It is time to sit on it and squish it down and punch it into shape and let the pieces settle for a while. It will be pretty solid, but after while of use, it will slightly deflate and then you can add more scraps to the top. I left mine for a couple of months (because I was trying figure out how I wanted to cover it once the velvet didn’t work out) but it actually worked out perfectly that way, because it really gave time for the scraps to squish down. I would recommend leaving it for a few weeks, making sure to sit on it every once in a while to press it down.

Once the scraps have settled as much as they are going to, open up a quarter of the seam in the top and add more scraps! Use more tiny shredded scraps to fill in the top and then once it is stuffed to overflowing, stitch the top back together. You will now have a very solid (and heavy) pouf form ready to be covered.

There are lots of ways you can make a pouf (like a Morrocan style or gathering the top like I mentioned earlier) but I ended up doing a simple 3 piece top, side and bottom since I chose to cover mine with a quilt!

white mattelasse quilt with frayed edge

This was the quilt that I had on my bed for about 14 years, and it has started to show it’s age. Now that I have a new quilt, it was time to retire this one. At first I was debating dyeing it, but then I realized that white would actually be the perfect colour for my very light and bright bedroom. Maybe if I eventually get the sofa of my dreams (vintage yellow and cream floral) I will recover the pouf in yellow velvet and put it with my sofa, but in the meantime it works quite nicely in my bedroom beside my closet. And since I’m not actually putting my feet up on it, like if it was in front of my sofa, the fact that it’s white should be all right. (I hope!)

cover pieces cut out of white quilt and ready to be sewn

My quilt had a border pattern which I utilized as the side piece- I cut one long strip 15″ wide the full length of the quilt. Then I cut the top and bottom circles out of the middle diamond quilted section. (PS. There was just enough fabric to use the end pieces of that strip to make a square cushion cover too!)

sewing outer fabric pieces together

Cut your outer pieces the same dimensions as the lining. Sew the top and side pieces together, again pinning in even quadrants and easing it all the way around.

Once I placed my cover on the pouf, I realized that the fabric had stretched out quite a bit and the top edge was hollow, so I brought it back to the sewing machine and sewed a 1″ seam allowance all the way around, instead of a 5/8″. Make sure to test the fit of your outer fabric, just to make sure that it fits well.

machine sewing 1" seam guide around the edge

Next stitch a seam guide along the edge of the bottom circle and the side pieces (in the same colour of thread as your fabric) so when you hand stitch them together, you will have a guide to follow. I stitched a 1″ seam allowance guide from the edge.

NOTE: This time we are sewing the top and side pieces by machine, not the bottom and side pieces as we did with the lining, because we are going to hand stitch the bottom this time, not the top. If you are using a fabric other than your upholstery fabric for the bottom, then that is the piece you will be hand sewing later.

measuring and fitting outer fabric onto pouf form

Again, measure your 4 quadrants on your bottom circle and side pieces and mark with pins or chalk. Place your cover onto your pouf and then flip it upside down. Now, line up your 4 points and pin together. Then work your way around between the 4 points and pin together, easing as you go.

Your stitched seam guide will help here because now you’ll know how much to fold under for your seam allowance. If, once you’ve pinned the pieces together, it looks like it’s going to be too loose then you can fold it more as needed. It’s OK if your bottom circle is a bit smaller than the top, because then the seam will tuck underneath the pouf and be hidden.

hand stitching bottom of outer fabric to side pieces

Now it’s time to start hand sewing again. This is best done while listening to an audiobook or podcast (I listened to A Tale of Two Cities)! When stitching, don’t start at one point and work your way all the way around, but instead start at one point, sew about an 8″ section, then rotate the pouf 180 degrees and sew a section directly across. Again, sew a section and then turn 90 degrees and sew a section and so on, until all of the sections meet. This way you can ease your fabric pieces together without ending up with bubbles, and, if needed, you can make adjustments- pulling the fabric in tighter etc.

Once you’ve knotted your last thread and turned the pouf right side up…then you are done. Congratulations, you have managed to save a huge amount of textile waste from the landfill and turn it into something both useful and beautiful!

finished pouf made from a worn out white quilt and fabric scraps sitting in my bedroom

recycled pouf made out of a white quilt sitting in front of the closet

I love how this project turned out and I had a lot of fun making it. It fits perfectly into my bedroom, and I am very pleased that I was able to use mostly salvaged materials; it was the perfect way of using up fabric scraps! The worst part about finishing this project is that I already have a bunch of new textile scraps…what on earth am I going to use them for?

Do you think you’ll make a project like this? What fabric would you use to cover it with? Do you have any other ideas for ways of using up fabric scraps?

vintage blue books sitting on top of the white quilted top of the pouf

zero waste salvaged pouf made out of a white mattelasse quilt with vintage blue books sitting on top of it